Pro plugin který jsem pracovně pojmenovat EventPress budeme potřebovat přidat nějaké nastavení, které nám umožní přidat vlastní funkce.
Jako základ si připravíme registraci na online webinář a nebudeme dělat nic složitého, takže přidáme následující pole:
- maximální počet účastníků
- minimální počet účastníků (minimum pro pořádání)
- datum a čas konání
Nic jiného potřebovat nebudeme
Do funkce musilda_eventpress_product_option si přidáme následující kód:
global $post;
$min_participants = get_post_meta( $post->ID, '_min_participants', true );
if ( empty( $min_participants ) ) {
	$min_participants = 1;
}
$max_participants = get_post_meta( $post->ID, '_max_participants', true );
if ( empty( $max_participants ) ) {
	$max_participants = 1;
}

woocommerce_wp_text_input(
	array(
		'id'                => '_min_participants',
		'value'             => $min_participants,
		'label'             => __( 'Minimal participants', 'musilda-eventpress' ),
		'placeholder'       => __( '1', 'musilda-eventpress' ),
		'description'       => __( 'Add minimum participants for event', 'musilda-eventpress' ),
		'type'              => 'number',
		'custom_attributes' => array(
			'step' => '1',
			'min'  => '1',
		),
	)
);
woocommerce_wp_text_input(
	array(
		'id'                => '_max_participants',
		'value'             => $max_participants,
		'label'             => __( 'Maximal participants', 'musilda-eventpress' ),
		'placeholder'       => __( '1', 'musilda-eventpress' ),
		'description'       => __( 'Add maximal participants for event', 'musilda-eventpress' ),
		'type'              => 'number',
		'custom_attributes' => array(
			'step' => '1',
			'min'  => '1',
		),
	)
);
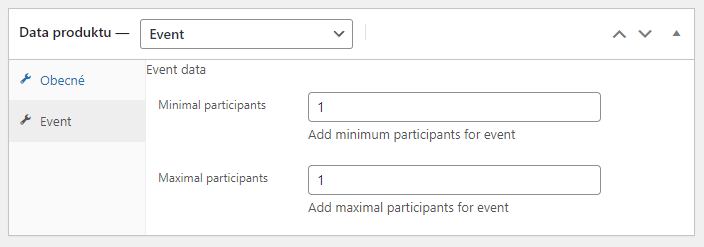
Výsledek:

To bylo to jednodušší, protože jsme využili funkci woocommerce_wp_text_input a vygenerovali si políčka.
Teď ale musíme přidat pole pro přidání výběru data a času konání. WordPress sice v sobě má jQuery a tak lze použít jQuery modul dat pickup, ale já se poslední dobou jQuery snažím vyhýbat, takže použiji https://bulma-calendar.onrender.com/
Abych mohl knihovnu použít, musím nejprve soubory uložit v pluginu a načíst pomocí enqueue:
/**
 * Add admin assets
 *
 */
add_action( 'admin_enqueue_scripts', 'eventpress_enqueue_admin_styles' );
function eventpress_enqueue_admin_styles() {
	$current_screen = get_current_screen();
	if ( 'product' == $current_screen->id ) {
		wp_enqueue_style( 'bulma-calendar', plugins_url( 'assets/admin/css/bulma-calendar.min.css', __FILE__ ), array(), '1.0' );
	}
}
add_action( 'admin_enqueue_scripts', 'eventpress_enqueue_admin_scripts' );
function eventpress_enqueue_admin_scripts() {
	$current_screen = get_current_screen();
	if ( 'product' == $current_screen->id ) {
		wp_enqueue_script( 'bulma-calendar', plugins_url( 'assets/admin/js/bulma-calendar.min.js', __FILE__ ), array(), '1.0', true );

                wp_enqueue_script( 'event-admin', plugins_url( 'assets/admin/js/main.js', __FILE__ ), array(), '1.0', true );
	}
}
Do funkce musilda_eventpress_product_option si za max participants input vložíme následující kód pro input date pickeru:
$event_start_date_time = get_post_meta( $post->ID, '_event_start_date_time', true );
if ( empty( $event_start_date_time ) ) {
	$event_start_date_time = '';
}

echo '<p class="form-field event_start_date_time">
	<label for="event_start_date_time">' . esc_html__( 'Event start date time', 'musilda-eventpress' ) . '</label>
	<input type="date" class="short" name="_event_start_date_time" id="event_start_date_time" value="' . esc_attr( $event_start_date_time ) . '"  maxlength="10" />
</p>';
Jako poslední musíme do souboru main.js, který vložíme do složky assets/admin/js, přidáme kód:
var eventStartDatTime = document.querySelector('#event_start_date_time');
if ( eventStartDatTime ) {
	bulmaCalendar.attach( eventStartDatTime, {
		type: 'datetime',
		dateFormat: 'dd.MM.yyyy',
		weekStart: 1
	});
}
Tento kód bude inicializovat datepicker, který bude vyvolán pomocí souborů bulma calendar, které umístíme do složek assets/admin/js a assets/admin/css. Všechny soubory najdete v commitu, který je odkázán na konci článku.
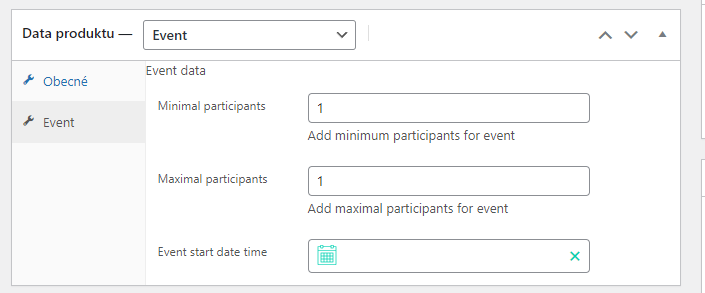
Pokud jste udělali vše, jak jste měli, výsledek bude vypadat takto:

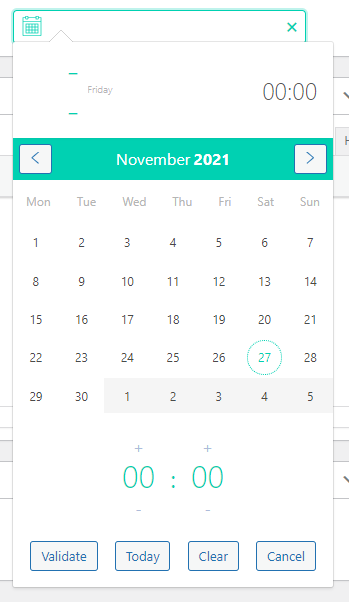
A samotný výběr data a času:

Tím jsme se dostali téměř na konec dnešní části, zbývá nám již jen uložit data, která vyplníme:
add_action( 'woocommerce_process_product_meta', 'musilda_product_fields_save' );
function musilda_product_fields_save( $post_id ){

	//Check autosave
	if ( defined('DOING_AUTOSAVE') && DOING_AUTOSAVE ) {
		return $post_id;
	}

	//Don't update on Quick Edit
	if ( defined('DOING_AJAX') ) {
		return $post_id;
	}

	//Don't update on Quick Edit
	if ( !empty( $_REQUEST['bulk_edit'] ) ) {
		return $post_id;
	}

	if ( !empty( $_POST['_min_participants'] ) ) {
		$_min_participants = sanitize_text_field( $_POST['_min_participants'] );
		update_post_meta( $post_id, '_min_participants', $_min_participants );
	} else {
		delete_post_meta( $post_id, '_min_participants' );
	}
	if ( !empty( $_POST['_max_participants'] ) ) {
		$_max_participants = sanitize_text_field( $_POST['_max_participants'] );
		update_post_meta( $post_id, '_max_participants', $_max_participants );
	} else {
		delete_post_meta( $post_id, '_max_participants' );
	}
	if ( !empty( $_POST['_event_start_date_time'] ) ) {
		$_event_start_date_time = sanitize_text_field( $_POST['_event_start_date_time'] );
		update_post_meta( $post_id, '_event_start_date_time', $_event_start_date_time );
	} else {
		delete_post_meta( $post_id, '_event_start_date_time' );
	}

}
V tuto chvíli máme připravenou část v administraci a v dalším článku zobrazíme uložená data na frontendu.
Aktuální commit najdete zde.


